Flows
The GridStudio platform features an advanced Flow management system, which acts as a sophisticated Complex Event Processing (CEP) engine. This system allows businesses to automate their operations, manage customer interactions, and enhance marketing strategies through the creation of intricate workflows.
Complex Event Processing (CEP)
Complex Event Processing (CEP) is a technology used to process and analyze streams of information about events, and derive conclusions from them in real-time or near real-time. It enables the detection of complex patterns and relationships between events, facilitating immediate responses to emerging situations. CEP is widely used in various industries for monitoring, tracking, and automating processes that require real-time analysis and response.
GridStudio Flow Engine
GridStudio's Flow feature is an advanced CEP engine designed to help businesses automate their processes and workflows. It supports the creation of complex flows that can act as bots or execute various actions based on specific events.
Key Features
- Real-Time Processing: Flows can process events in real-time, enabling immediate responses to customer interactions and other triggers.
- Event-Driven Architecture: Flows are triggered by events such as receiving a new message, creating a new customer, or receiving a payment.
- Automation: Flows can automate repetitive tasks, enhancing efficiency and reducing the need for manual intervention.
- Customization: Businesses can tailor flows to their specific needs, creating bespoke solutions for their operations.
Flow Management Screens
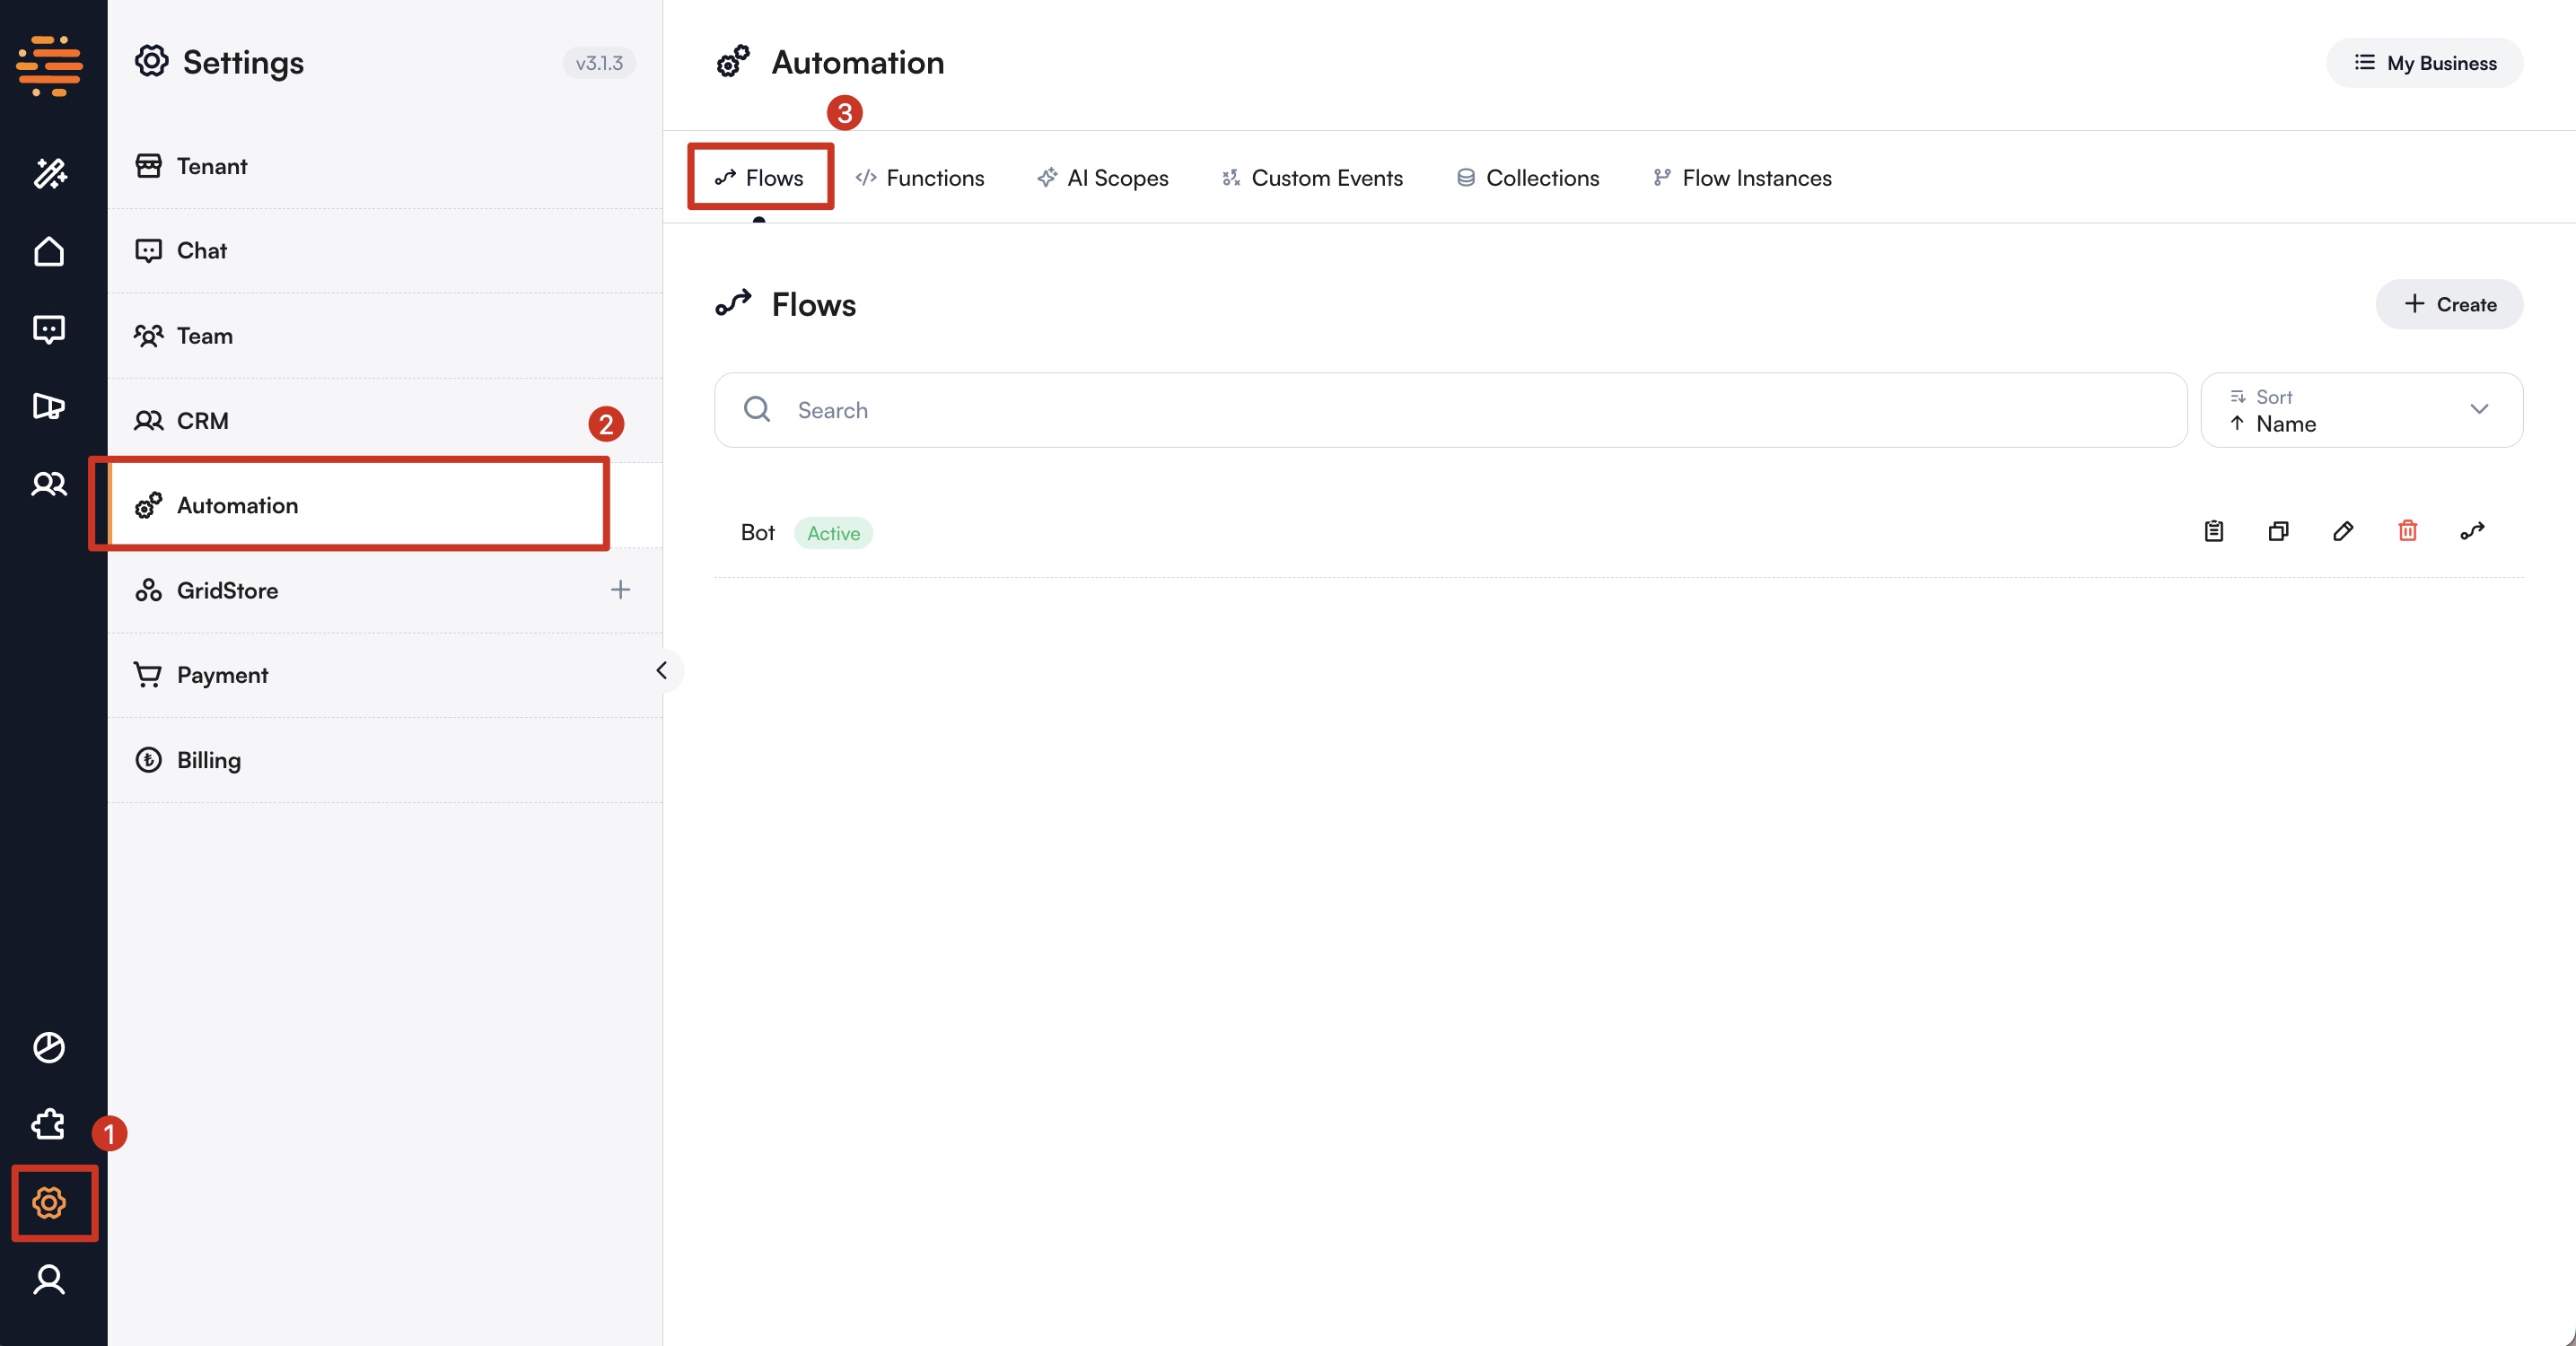
Flow List Screen
On the Flow List screen, you can view all existing flows. You can create a new flow, edit an existing flow, or delete a flow that is no longer needed.
Create Flow Screen
On the Create Flow screen, you can define the flow name and specify if the flow should act as a bot.
Flow Designer Screen
The Flow Designer screen allows you to create and configure nodes. You can add event nodes, action nodes, function nodes, and conditional nodes to design your flow.
Types of Flows
- Bot Flows: These flows act as chatbots during live sessions, automatically answering questions, providing information, and guiding customers through tasks. They keep the conversation context and help with support or sales without human help.
- Event-Driven Flows: These flows run when specific events occur, like receiving a payment or updating a profile. They automate tasks behind the scenes, such as sending notifications or updating records, without requiring a live conversation.
Creating a Flow
To create a flow, follow these steps:
- Define Flow Name: Enter the name of the flow. This name will be used to identify and manage the flow.
- Bot Behavior Option: Enable the "Is bot?" option if you want the flow to act as a bot. This allows the flow to behave as a bot during customer sessions.
- Define Events and Actions: Specify which events (triggers) will initiate the flow and what actions (responses) will be taken when these events occur. For example, sending a response when a new message is received or performing a task at a specified time.
Node Creation and Design
The Flow management system features a user-friendly drag-and-drop interface for designing flows. Users can create and connect nodes to build their workflows visually.
1. Creating Nodes
Event Nodes:
Trigger the flow when specific system or user actions occur.
- Customer Events:
- New Customer Created: This event is triggered when a new customer is added to the system, allowing the flow to start actions related to customer onboarding, such as sending a welcome message or adding the customer to a mailing list.
- Profile Field Updated: This event occurs when any customer profile field (e.g., name, email, phone number) is updated. It can trigger actions like sending an update confirmation or syncing the data to another system.
- Flow Events:
- Flow Started: This event triggers when another flow is started. It can be used to kick off a sequence of actions based on the initiation of another process, allowing for more complex workflows.
- Flow Finished: This event is triggered when another flow completes. It can be used to trigger follow-up actions, such as sending a final message or updating records based on the flow's results.
- Message Events:
- New Message Received: This event is triggered when a new message is received from a customer. It can be used to start actions such as responding automatically, tagging the customer, or forwarding the message to a support team.
- New Message Sent: This event fires when a new message is sent to the customer. It can be used to log the message or trigger follow-up actions like scheduling a reminder.
- New Reaction Received: Triggered when a user reacts (e.g., thumbs up, heart) to a message. This can help track engagement and prompt further actions based on the customer's interaction.
- Session Events:
- New Session Created: Occurs when a new session is started with a customer. It can be used to initiate the customer support workflow, assign agents, or open communication channels.
- Session Reopened: This event happens when a session that was previously closed is reopened. It allows for re-engagement actions such as sending an update or reassigning the session.
- Session Closed: Triggered when a session is closed. Actions triggered by this event may include sending a "thank you" message or ending the flow with a feedback request.
- Session Assigned: This event fires when a session is assigned to an agent or team. It can be used to notify the assigned person or team that they have a new session to handle.
- Session Unassigned: This event is triggered when a session is unassigned from an agent or team. It could trigger actions like notifying a supervisor or reassigning the session.
- Other Events:
- New Payment Received: This event occurs when a payment is received, allowing you to trigger actions such as updating the customer profile, sending a payment confirmation, or processing the next steps in the transaction.
- Wait is Over: Triggered when a wait timer expires. This event is useful for actions like following up with the customer or moving to the next step in a timed process.
- Custom Event: A user-defined event that can be set up for specific custom triggers. It allows you to define your own actions and responses for any specific business needs that are not covered by predefined events.
Action Nodes:
Perform actions in response to events.
- Messaging Actions:
- Send Message: This action sends a message to the customer in the current session. It's used for communication, such as replying to customer inquiries or sending automatic updates.
- Send Short Message: Sends a quick predefined message to the customer, ideal for sending short responses or information that doesn’t require personalization.
- Send Template Message: Sends a pre-approved WhatsApp template message. This is particularly useful when communicating with customers outside the 24-hour window allowed for freeform messages.
- Create AI Chat Completion: This action generates a reply using AI, allowing the system to respond to customer messages dynamically and intelligently.
For more information on AI prompt generation, check out our AI Prompt Guide!
- Customer Profile Actions:
- Set Customer Profile Field: This action updates a customer profile field (e.g., name, phone number, email). It can be used to keep customer records up-to-date automatically.
- Set Customer Tag: This action adds or removes tags associated with the customer. Tags can be used for segmentation, categorizing customers, or tracking specific attributes or behaviors.
- Session Management Actions:
- Assign Session: This action assigns a session to an agent or team. It’s used to distribute customer inquiries to the right person or team.
- Unassign Agent From Session: Removes an agent or team from a session, which could trigger reassigning the session or notifying a manager for further action.
- Terminate Session: Ends the current session with the customer. This action can trigger follow-up processes like feedback requests or closing the conversation.
- Set Session as Poll: Marks the session for feedback collection, prompting customers to rate or review the service after the session ends.
- Flow Control Actions:
- Start Another Flow: This action triggers another flow to run, allowing you to create more complex multi-step workflows where one flow starts another based on certain conditions.
- Emit Custom Event: Sends a custom event to be caught by other flows or systems. This is useful for triggering actions in other workflows or external integrations.
Function Nodes:
Handle complex logic and integrations.
- Execute Function: Allows you to run complex logic or custom functions within your flow. This can be used to integrate external services or perform advanced calculations.
Hybrid Nodes:
Combine interaction and logic.
- Question Answer: Asks the customer a question and stores the answer for further use in the flow, such as personalizing responses or making decisions based on the answer.
- Wait: Pauses the flow for a specified amount of time. This is useful for handling time-sensitive actions or creating delays between events.
- Opt-in: Presents a consent request to the customer and stores their response. It’s useful for getting permission before continuing with certain actions, such as marketing or data processing.
Conditional Nodes:
Make decisions to branch the flow based on specific criteria.
-
If Node: This node checks a condition (yes/no) and directs the flow based on the outcome. It allows you to create different paths depending on customer responses or system states.
-
Condition: Defines the logic that determines which path to take. You can create one or more condition groups using AND/OR logic. Each group can include checks based on:
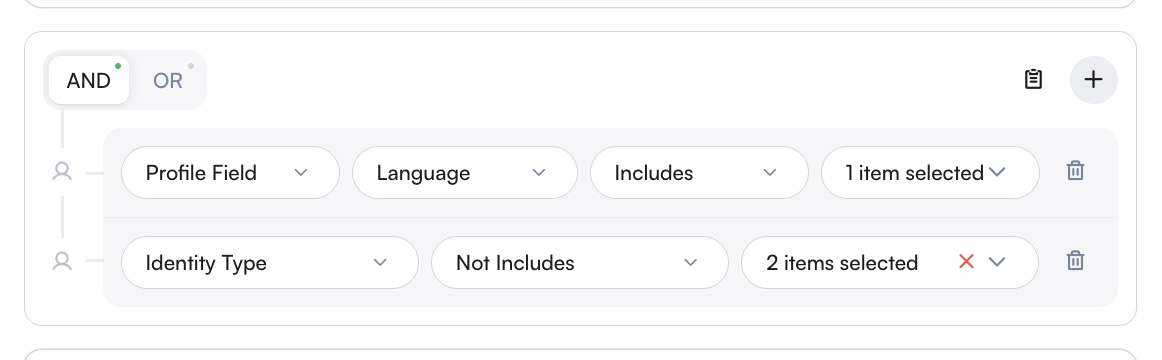
- Customer:
- Profile Fields: Filter by user attributes such as name, phone number, gender, tags, or custom-defined fields.
- Identity Type: Check the channel through which the customer is communicating (e.g., WhatsApp, Web, Instagram).
-
Payment: Filters based on payment data like status or amount.
- Payment Amount: Compare the total payment amount with a specified value.
- Payment Currency: Filter based on the currency used (e.g., USD, EUR, TRY).
-
Date:
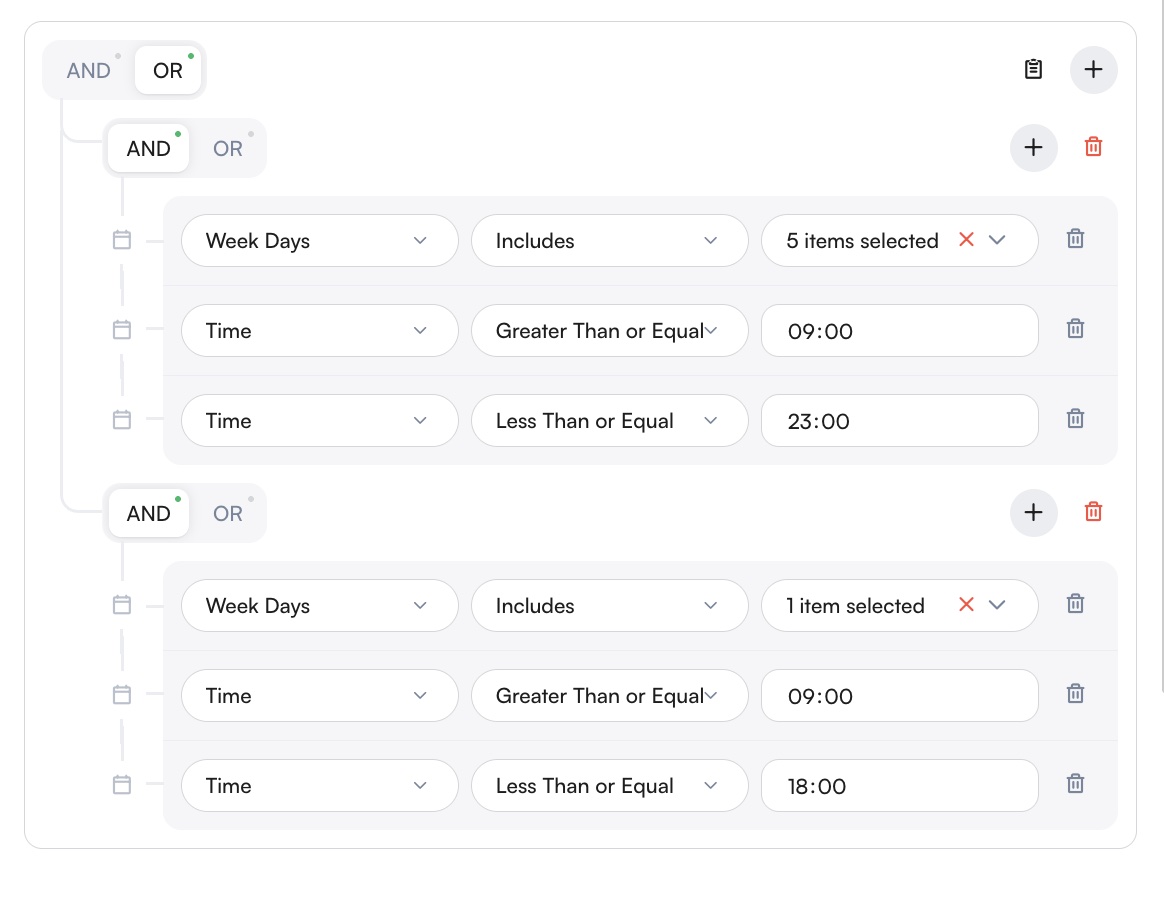
- Date & Time: Specify a precise date and time for triggering or skipping flow logic.
- Time: Apply conditions based on specific hours or time ranges (e.g., between 09:00–18:00).
- Weekdays: Filter logic by day of the week (e.g., only run on weekdays or weekends).
-
Session:
- Session Type: Filter by the session category such as Bot, Bulk, Custom Flow, Spam, etc.
- Session Status: Determine if the session is currently open or closed.
- Channel Type: Filter by the type of communication channel, such as WhatsApp, Instagram, Webchat, etc.
- Channel: Specify the exact communication channel instance, such as a particular WhatsApp line or specific Instagram account.
- Customer Username: Apply conditions based on the username linked to the session.
- Termination Message: Evaluate the content of the message that ended the session.
-
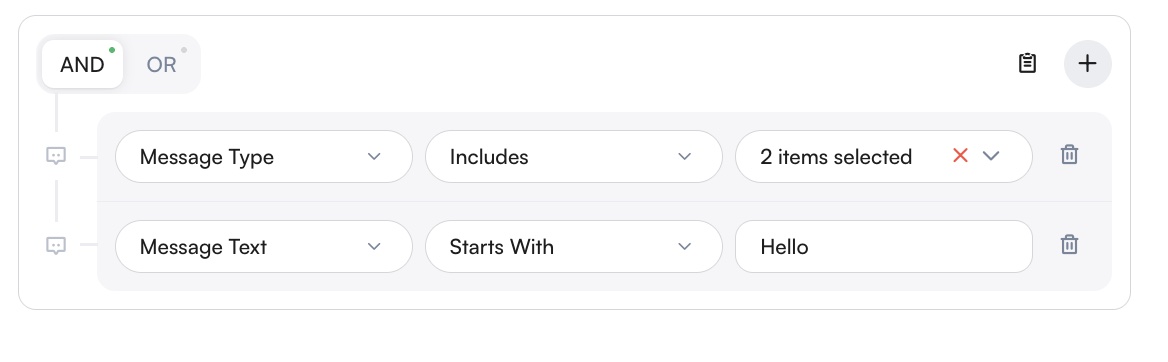
Message: Conditions based on incoming message content (e.g., message text includes “price”) or message type (e.g., text, image, voice).
- Flow: Previously set flow variables or values.
These rules allow you to tailor the flow dynamically—for example, only proceed if the customer sends a specific keyword, or if the message type is "text".
- Customer:
Multiple conditions can be grouped together using AND (all must be true) or OR (at least one must be true). This enables more advanced filtering logic to control flow behavior.
Switch Node:
Similar to the "If Node," but used for branching based on multiple possible outcomes. This is useful when there are more than two possible conditions to consider.
2. Connecting Nodes
- Drag-and-Drop Interface: Users can drag and drop nodes onto the canvas to build their flow.
- Linking Nodes: Nodes can be connected by dragging arrows from one node to another, establishing the sequence of events and actions.
Use Cases
Customer Support Automation
- Customer Interaction Automation: Automate customer interactions by designing workflows that handle common queries, guide users through processes, and provide timely responses. This ensures a consistent and efficient customer experience.
- Customer Support: Create bot flows to automatically respond to customer support requests and provide solutions, improving response times and satisfaction.
Marketing Campaigns
- Marketing Automation: Design flows that automate marketing processes, such as sending promotional messages or following up with customers based on their interactions. This helps in engaging customers effectively and driving conversions.
Internal Process Automation
- Internal Process Management: Develop flows to streamline internal business processes, such as task assignments, reminders, and notifications. Use flows to automate processes like data synchronization, report generation, and task management, improving efficiency and reducing the need for manual intervention.
- Complex Business Logic: Implement complex business logic that involves multiple steps and conditions. Flows can handle intricate processes, ensuring that each step is executed correctly and efficiently, reducing errors and improving overall business operations.
GridStudio's Flow management system is a powerful tool that enables businesses to create dynamic, automated workflows tailored to their specific needs, enhancing efficiency and customer satisfaction.